Pruning Fruit Trees

Image


In February 2013 we acquired plot 4 at Choice Allotments, St Leonards, Sussex. We were overly excited as it came with FIVE established fruit trees: Two pear trees, two cherry trees and a plum tree.

I was thinking about all the preserves, chutneys and jams we were going to make, not to mention the pies and crumbles… of joy of joys, since a child I’ve always wanted fruit trees. Growing up in the leafy county of Surrey both my neighbour’s had fruit trees, cherries, plums, pears, peaches, greengage and apples. My parents weren’t into growing fruit or vegetables; they had shrubs and conifers!

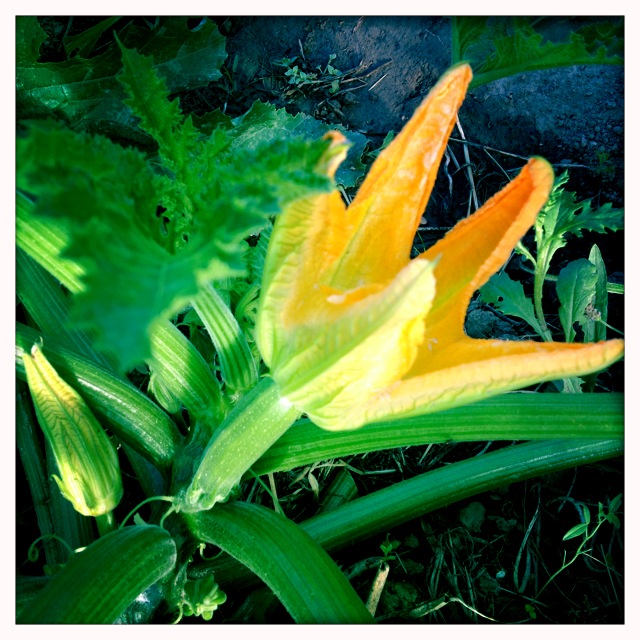
The season got off to a great start. Lots of blossom and fruit buds. Those fruit buds produced so many baby fruits… I was thrilled… I buy kilners jars, loads of them…..then it all went horribly wrong. JUNE DROP!!!

Image

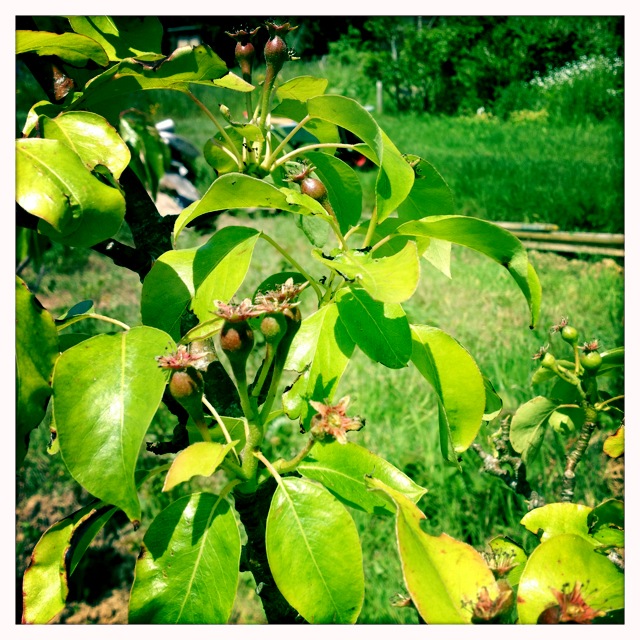
June drop is nature’s way of discarding any damaged or diseased fruit, they literally just drop from the tree. We were left with five pears and one plum. AND the birds ate our entire cherry crop because I failed to cover the trees! It wasn’t a good year and the excitement soon turned to intrigue. Why did nearly every fruit fall from the tree? How sick is this tree? So I researched it.

Image

Pear trees naturally grow laterally, however, the problem with this is the branches get crowded as they fight for light. Also, as the branches get crowded, it’s difficult for air to circulate making the tree more susceptible to disease.

Image

Ideally you want branches to create a scaffold frame like this. (See below)

Image

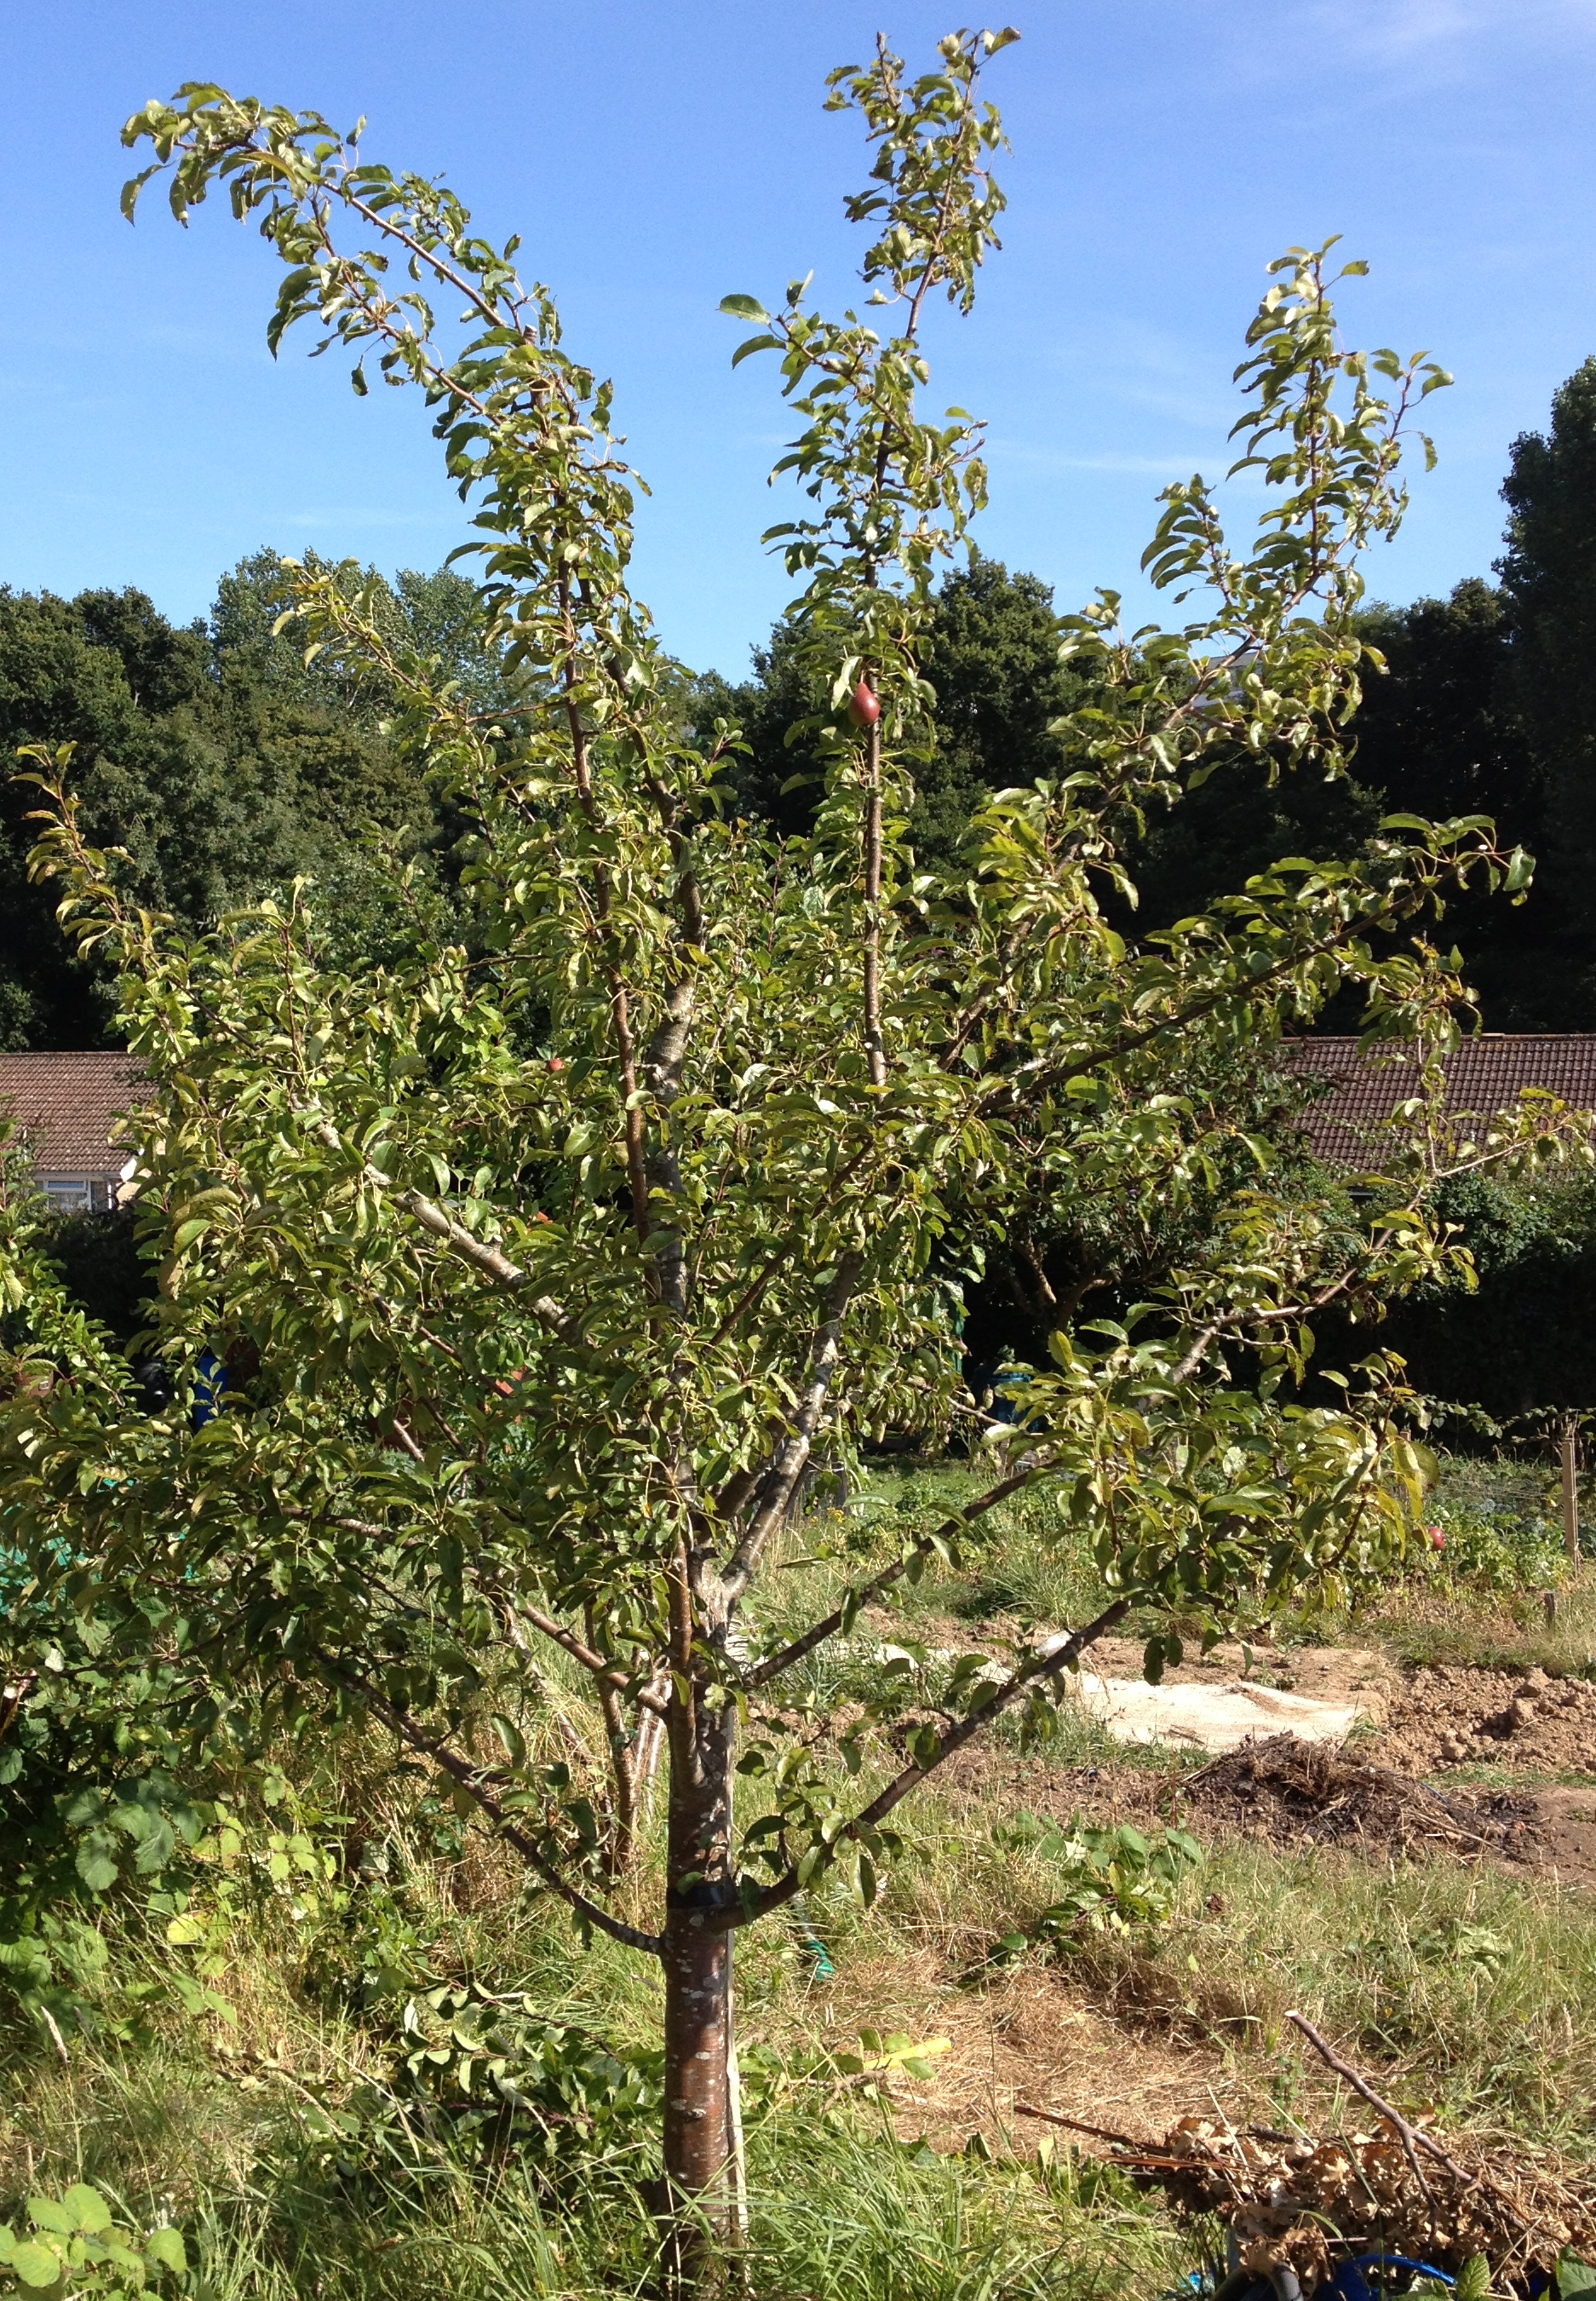
Branches coming from a central leader, or main trunk, at a 45 to 60 degree angle are best. Pear tree branches don’t naturally grow outwards/sideways, by forcing them to do so it slows up the rate of tree growth but it helps promote fruit production.

So that was it, we needed to prune our trees to bring them back to health. I’ve not pruned before so more research was required.

Pruning notes:

It’s suggested that pruning an old neglected deciduous (latin for falling off or shedding) tree should be done in stages over a number of years. Maybe set a three year plan….. patience is required….. oh dear!

The reason for this:

Hard pruning in the winter will encourage the tree to grow excessively and vigorously in the spring and it won’t promote fruitful growth.

Whilst hard pruning in the summer may stunt the trees ability to grow.

Over pruning can also lead to the production of water shoots/suckers. These suckers typically form at the base of grafted trees.  Water shoots are tall upright leafy branches that don’t produce flowers or fruit. We have one of those on the little pear tree.

There are a few schools of thought for pruning neglected deciduous trees

a) Pruning neglected trees should be done in the winter or during the dormant period, as it’s easier to see the structure of the tree without its leaves.

However, this will promote woody growth, which we don’t necessarily want.

b) It is recommended that no more than a quarter of the canopy be removed in any one year as this would lead to problems associated with over-pruning.

Good point.

c) Summer pruning, this will stimulate the least amount of woody re-growth and will promote fruit growth.

This is probably the best strategy for our requirements. We certainly need help with the promotion of fruit growth and we definitely don’t need the tree to grow an bigger. 


Understanding summer pruning v’s winter pruning – Deciduous Trees

To understand this we need to understand the yearly cycle of the deciduous tree.

Let’s start in the spring. Deciduous trees ‘wake up’ from a period of winter dormancy, similar to animals hibernating. During the winter, the metabolism of deciduous trees slows right down, and with no foliage or growth to support, the tree requires very little food to survive and any surplus food supplies are stored in the trees root system.

Focusing back on spring…..during spring ,deciduous trees start to form leaves which will provide the tree with a mechanism to produce a food/fuel supply throughout the season via a process called photosynthesis. Briefly, just to recap from those biology lessons all those years ago ….. photosynthesis is the process where trees/plants converts the sun’s energy into chemical energy, sugars. These sugars provide the plants/trees with fuel. Plants require a combination of carbon dioxide, water and light energy (the sun) to produce sugars. Sunlight is absorbed by chlorophyll, a green pigment located in the plants cell structures called Chloroplasts. It’s within this cell structure that photosynthesis takes place. The leaf absorbs carbon dioxide through tiny pores in the plants/trees leaves called stomata. Oxygen (the bi-product of the plant using the sugars as fuel) is also released through the stomata. Water is obviously obtained via the root system.

Okay, now think back to last year when the tree had leaves.

In theory, the more leaves the tree has the more fuel can be produced by the tree and will therefore more fuel will be available to be stored in the trees root system during the dormancy period.

On the flip side, it must therefore be true that deciduous trees with less foliage will produce less fuel, which obviously means there will be less fuel available to store in the root system during the winter/dormancy period.

So now fast forward to spring. The tree is using stored fuel to promote spring growth.  In it’s simplest form, the less fuel the tree has stored in its root system the slower the rate of growth. Conversely, trees with greater quantities of stored food will show more vigorous growth rates.

So understanding this basic principle, what impact does summer pruning have on deciduous trees?

Deciduous trees are in full leaf during the summer. By reducing this foliage it will in turn reduce the trees ability to produce fuel/food. Thus, reducing the quantity of fuel that can be stored in the trees root system during the dormant period. Therefore, during the following spring you would expect growth rates to be slowed.

Winter pruning is different. In the autumn light levels decline and leaves fall from the tree. The quantity of food stored in the tree is based on the quantity of foliage the tree had during the summer. This fuel/food is stored in the root system during the dormancy period. So what happens when the tree is pruned during the winter? The amount of fuel/food stored in the root system remains unchanged, enough to fuel a much larger tree. By winter pruning back the tree has less structure for the tree to fuel. This simply leads to increased vigorous levels of growth, as there is more food than the tree ordinarily requires.

So what did we do to our poorly fruit trees?

We did some summer pruning, to reduce the lateral growth and open up the tree to improve air circulation, ensuring we didn’t remove more than 25% of the canopy. We removed the low, dead, diseased and broken branches, and some branches that were crossing over. We did our best to create a scaffold frame structure, retaining branches that are 45 to 60 degree angles to the central leader or the trees main trunk.

We also shortened all the branches, cutting back this year’s growth to about one inch. We cut the branch to an outward facing bud, a little protruding knobby thing you find on the branches….. This is to help promote fruit bud development next year rather than wood growth. The advantage of summer pruning, it opens up the tree enabling more sun to get to the fruit buds improving the growth and flavour of fruits.

We didn’t do any winter pruning.

We are now waiting to see what happens. Fingers crossed, and legs, and toes and eyes…. Actually anything that can be crossed!


Posted in Pruning

Growing Peas

Image

Peas form part of the legume family and are one of the oldest cultivated vegetables in the world.

They are very well suited to cooler climates, and are certainly not keen on hot weather, so they are best grown as an early summer crop. Some varieties even stop producing pods in protest if temperatures exceed 20C. Peas are climbers with strong tendrils so will need support.

Everyone enjoys sweet tender peas, but that can be quite difficult to achieve. Pea pods need to be picked at the right time and frequently. Failure to do this can lead to a rather disappointing crop. As soon as peas are picked, or if the pods are left on the plant too long, the sugars in the pea start to turn to starch. The peas become mealy and they lose their sweetness and flavour.

There are two types of peas:

Podding or shelling varieties; where the pod is discarded and only the seed eaten.

And the

Non-shelling, flat-podded varieties such as mangetout and sugar-snaps. In this case the pods are also eaten

Mangetout and sugar-snaps are generally easier to grow than podding peas. And they are incredibly sweet unlike shop bought ones!

In addition to this, peas like potatoes are grouped by the time it takes for the plant to reach maturity.


Type Sow Harvest  Sow to Harvest
First Early March to June June to September 12 weeks
Second Early March to June June to October 14 weeks
Maincrop March to June July to October 16 weeks


By sowing a couple of varieties over a month or so, cropping can be extended from mid-June to mid-October. Obviously these dates are subject, depending on germination timings and colder weather will extend the sow to harvest timing.

Peas grow best in a sheltered position that gets plenty of sun, but they can tolerate partial shade. Peas grow on most soil types, although they prefer well-drained soil with plenty of organic matter. They can struggle in heavy clay soils… tell me what doesn’t! Legumes are nitrogen fixers so do not add nitrogen to the soil before planting. An overly rich soil produces lots of leafy growth and a reduced crop of peas. Peas like a lot of moisture.

Seeds can be sown directly outdoors or started off indoors. If sowing outdoors never sow in cold, wet soil, as the seeds will rot. Oops!

If the conditions are right to sow directly outdoors then start by digging out a flat-bottomed trench 5cm deep and 20 to 25 cm wide. Lightly fork over the bottom, water the soil and then sow the seeds roughly 7.5cm apart, press them lightly into the soil. Cover with soil and lightly pat down. Val Bourne, gardener extraordinaire, says take heed from the old adage ‘One for the mouse, one for the crow, one to rot and one to grow’ So that’s a 25% chance of getting a plant, so maybe probably best to start indoors.

Place some twiggy supports straight after sowing, one has to be optimistic…the height should depend on the variety of pea. Never allow the soil to dry out, as this will dramatically reduce pea production.

After sowing the seeds cover with mulch to help retain soil moisture. Water well at least once a week, and especially when the plants start to flower.

Pea seeds germinate at temperatures between 40F and 60F. If the soil is 40F then the pea seed may take as long as a month to germinate. If the soil temperature is at 60F then germination may be only take a week.

If conditions are poor it may be worth starting them off indoors. Peas don’t like root disturbance so ensure you use decent sized deep pots. Fill the pot with compost and make a hole about 1.5 cm deep. Gently water. Place a pea seed in each hole. Cover with compost. Leave in a warm place (around 60F) to aid germination. Before planting out ensure the seedlings are ‘hardened off’ by placing in a coldframe. Protect from cold weather by covering young plants with fleece.

On average pea plants take around 100 days to mature.

Harvesting

Expect to pick pods from June. See table above for estimated dates.

Podding peas are ready to pick once the pod looks well filled.

Ensure you pick pods while they are young and tender. If you allow them to get too big and tough they will turn starchy and lose their sweetness and flavour. I think this is what happened to our crop in 2012, they were vile!

Even if the pods are past their prime pick them anyway as this will leave the plant resources to produce new pods.

Peas start producing pods at the bottom of the plant first. Therefore always start picking pods from the bottom of the plant.

Pick pods regularly to help increase the harvest.

If you are lucky enough to get a glut of peas they freeze well.Freeze them immediately after harvest to retain their rich flavour. Blanch the peas for a minute in boiling water, immediately drain and plunge into ice water for two minutes. Drain again, loosely pack the peas in plastic bags or containers, and pop them into the freezer. Use the peas within nine months.

Potential Problems

Pests

Mice and other rodents are partial to pea seedlings and will devour them as they emerge.

Birds can also attack young crops. Protect with fleece in cold conditions and netting as the weather warms up.

Pea Moth

The pea moth is a tiny, drab moth whose larvae (caterpillars) feed on garden peas.

Pea moth caterpillars feed inside shelling pea pods but the, often severe, damage is often only spotted at harvest. Consequently, the pods need to be shelled with care to avoid including some meat with the veg!

Peas can be grown under horticultural fleece, insect-proof mesh such as Enviromesh when the plants are in flower, to prevent female moths laying eggs on the plants.

Powdery mildew

Powdery mildew is the most common disease of peas, usually striking as the weather warms. Young leaves and tips will be covered with grey/white talc. This will eventually spread to the entire plant. It can happen if the soil is too dry and also in older plants reaching the end of their life. To help prevent this disease keep the plants well watered and ensure there is good air circulation.

Root rot.

Another diseases that cause problems root rot. Young plants will turn yellow and shrivel. Roots turn black and die off. This may be due to overwatering plants in cold wet soils with poor drainage. It may also be due to an organism in the soil.

Posted in Peas

Growing Leeks

Image

Leeks are members of the alliums family.

Leeks grow best in a sunny position, in free-draining, fertile soil. There are essentially two things that leeks need to grown well: nitrogen and moist soil (sorry I know you hate those words, especially together!). Alliums are shallow rooted and cannot draw moisture deep from the ground. When leeks get ‘water-stressed’ they have a tendency to bolt. Therefore it is essential to keep them well watered, especially during dry spells.

Leeks occupy the ground for a long period of time, as much as 30 weeks.

The soil temperature needs to be at least 5 degrees centigrade for leek seeds to germinate. So, if growing from seed, it’s usually best to start them inside. Seeds can be sown from January through until April. Earlier sowings, however, increase the chances of plants bolting, so it’s probably best to sow seeds around March or April.

Fill pots or seed trays with multi-purpose compost and lightly pat down. Scatter seeds thinly across the surface. Cover with a few millimeters of compost. Water and keep moist! Cover with glass or place in a propagator and leave on a windowsill. Never allow the compost to dry out, check daily.

The seeds will take between 2 to 3 weeks to germinate. It will take a further 10 weeks to 12 weeks for the seedlings to grow strong enough to be planted out. They will grow to about 15cm to 20cm tall, pencil sized. Before planting out ensure the leek seedlings are hardened off for at least two weeks before transplanting.

Leek seedlings are usually planted outside anywhere from May through to mid July. Before planning out ensure the soil is well prepared and fertile.

To plant out, make some deep holes that are at least 6 to 8 inches deep. The hole should be deep enough to cover up the leek to its third leaf. The purpose of this is to maximize the amount of tender white stem the leek with produce. The holes should be 6 to 8 inches apart for decent sized leeks or 3 to 4 inches for smaller leeks. Rows should be 12 inches apart.

To promote root growth trim the leaves by a third and the tips of the root.

Place a leek into each hole ensuring the roots go to the bottom. Next water each hole; the soil should wash in and fill in the hole. Don’t be tempted to fill in the holes with soil by hand. Cover the crop with mulch to help the ground retain moisture.

As the leeks grow, draw up dry soil to cover the stem. This is known as blanching. This ensures the stems remain white. Try not to allow the soil to fall between the leaves.

Leeks are left in the ground for 30 weeks plus and they can be harvested over a long period of time. Some varieties are very hardy and can be over wintered. Harvesting can start as early as September with some varieties harvesting as late as March the following year.

Most plant growth takes place in the autumn. Ensure that plants are kept well watered, they require about an inch of water a week.  Additionally, ensure the plants are given liquid feed weekly throughout the growing period. Apart from this there is very little maintenance required about from keeping the leek bed weed free.

Potential problems.

Rust

Leek rust is a form of fungal disease. The fungus causes bright orange pustules on leaves. The infection can be worse on nitrogen rich soils with low potassium, so be careful with fertilizer applications. Most attacks occur from mid-summer until late autumn. If the pustules break open fungal spores can become airborne

Ensure the plants are spaced sufficiently to provide good airflow.

Avoid watering the outer leaves.

In the summer months, remove affected foliage when you see it. New foliage will be healthy.

Leek moth

Leek moth is a small brown moth, which can be a devastating pest, particularly along the eastern and southern coastal areas of England.

The young caterpillars tunnel into the leaves of the leek to feed leaving whitish brown patches.  Older caterpillars tunnel down into the stem of the leek causing extensive damage, which may cause the leek to collapse or rot from within.  After about a month, they crawl back up the leaves to pupate and spin white cocoons within the foliage.

There are two generations of caterpillar each year, the first around May to June, and the second around August to October.  The second generation of pupae and moth hibernate in plant debris.

If you spot leaf damage, remove any caterpillars and cocoons that you see and destroy any badly infested plants.  Remove all plant debris at harvest time and dig over the soil to disturb the hibernating moths and pupae.  I

If leek moth is a known problem in the area, then cover the seedlings with horticultural fleece to prevent the adult moths from laying eggs on the leaves.


Posted in Leeks

Growing Courgettes

IMG_0779

Courgettes originate from central and South America where they have been eaten for thousands of years. Christopher Columbus brought them to the Mediterranean around 500 years ago.

The varieties that we grow today evolved in Italy, most probably at the end of the 19th century. Early varieties will often have the name of nearby cities in their name, e.g. Verdi di Milano; Striato d’Napoli, Tondo di Piacenza, Trieste White Cousa Courgette.

Courgettes are part of the gourd/squash family.

Growing Courgettes from Seed

Sow courgette seeds indoors, from April through to late May.

Courgette love warmth and seeds will only germinate at temperatures above 17 degrees centigrade.

Sow seeds in 3 inch pots using a good quality compost. Sow the seed upright and cover with about half an inch of compost. Water well, label and either cover with cling film or place in a propagator. Ensure the compost doesn’t dry out. The seedlings should appear within a few days. They grow at a rapid rate so it’s likely the seedling will need to be repotted.

Before planting out, the plants will need to be hardened off. Place them into a cold frame at least two weeks before planting. Make sure all risk of frost has gone before planting out.

Plant in a sunny position, ensuring the plants are spaced three feet apart. They grow huge!

Courgettes are hungry feeders so will benefit from plenty of organic matter. As they are large leafy plants they will draw a lot of moisture from the ground, so ensure they are watered regularly. Additional feeding may also be beneficial, but avoid nitrogen rich fertilizers, as this will encourage lush sappy growth making the plant more prone to fungal infection.

Whilst courgettes require a lot of moisture there is a risk the plant will rot if there is too much moisture around the base of the plant. Good drainage is therefore essential. Target the roots and try not to water the foliage to help prevent fungal infections.

Keep the plants moist throughout the growing season especially when the fruit starts to grow.

Courgette Flowers

Courgettes produce two types of flower, the male and the female. Fruit is only formed if the male flower pollinates the female flower. Plenty of bees are required to help pollination.

The Male flower grows on a long stalk on the actual stem of the plant, usually on the leaf axils (where a leaf meets the stem). The male flowers do not produce fruit. The male flower will last longer than the female flower and it is typically smaller.

The female flowers tend to be much larger and grow on the end of each emergent courgette. This will look much shorter than the stem the male flower grows on. If the female flower isn’t pollinated the baby courgette may grow for a bit but will eventually either dry out or rot off. If there is a lack of insect activity to pollinate the plants the other option is to hand pollinate. (Just sounds wrong to me!). This is done by removing the corolla from the male flower and brushing it against the stigmas of the female flower (it’s sounding worse!).

Harvesting

Harvest the courgettes when they are about 3 to 4 inches long. Cut the fruit rather than breaking them off to avoid damaging the plant. Harvest regularly to encourage the development for new fruit. Each plant should produce around 20 courgettes throughout the growing season.

Potential problems.

Slugs

Growing courgettes is fairly easy and trouble free. The courgettes number one enemy is the SLUG!

Best things to deter to deter slugs are:

Place grit around the young plants. Slugs hate grit as it rips their slimy little bellies.

Oatmeal is one of the slug’s most favourite foods; after tender young seedlings.  Place a pile close to the courgette plant. The slugs won’t be able to resist. After eating the oatmeal swells up inside the slug and they eventually explode…

Beer traps. Slugs love beer, in particular stout. Slugs are attracted by the yeasty scent; they fall into the trap, get drunk and drown. All parties are happy!

Check regularly under stones and pots. Slugs and snails love to hide on cool damp places. Collect and feed to chickens who like nothing more than a snaily/sluggy snack.

Powdery Mildew

Powdery mildew is a fungal disease that infects the squash family. Oddly it thrives when the days are dry and warm but the nights turn cooler, typically around late August early September.

Try to avoid overcrowding and promote good airflow to reduce humidity. Also try to avoid watering the actual leaves, stems and fruits.

As soon as you see an infected leaf cut it off to try and prevent the fungus spreading.

There are mixed thoughts on whether infected leaves can be composted or not. Probably best not to compost the leaves but to burn them instead to ensure the spores don’t survive.

Once powdery mildew takes hold it will stunt the growth of the plant and affect the plants ability to produce fruit. In severe cases the leaves will turn yellow and eventually die back.

Posted in Courgettes

Understanding Fertilizers

During the growing season, vegetables use up a huge amount of the soils nutrients, so it’s important to replenish depleted nutrition.

Fertilizers are derived from animal or vegetable matter and can be organic or synthetically produced with chemicals.

The advantage of using organic fertilizers is they are slow acting and more gentle on the plants than the synthetic fertilizers. Organic fertilizers are not produced in a form that can be immediately absorbed by the plant. Soil is a living organism, so it’s important to consider what we put into it. Organic fertilizers help maintain healthy soil. This is achieved as the micronutrients in the organic fertilizers must first be broken down by soil bacteria or fungi before they can be converted into a form that can be utilised by plants.

Whilst synthetic fertilizers have plenty of micronutrients, they also contain acids, sulphuric and hydrochloric acids, which dissolve the soil crumb. Synthetic fertilizers also adversely change the soils pH level, which impacts the microorganisms living in the soil. These microorganisms provide the plant with natural immunity to disease. Synthetic fertilizers also prevent the plant from adsorbing trace elements from the soil.

Synthetic fertilizers tend to be water soluble, meaning they are easily washed through the soil.  So any nutritional benefits maybe short lived. Whilst it’s less likely that the nutrients resulting from the use of organic fertilizers will be easily washed away during heavy rainfall.

Fertilizers are made up of three key micronutrients:

N – Nitrogen

P – Phosphorous

K – Potassium.

By law, any fertilizer sold must state, on the packaging, the quantities of nitrogen, phosphorous and potassium contained in that fertilizer.

For example: If the packet is labelled 6:4:4 this means there is 6 grams of nitrogen to every 100 grams of fertilizer. And 4 grams each of phosphorous and potassium to every 100 grams of fertilizer.

The remainder of the fertilizer will be made up of vitamins and other minerals plus organic matter, if organic, or fillers if not.

Every packet of fertilizer will display the ratio in the same order, N – P – K. This will help identify the type of fertilizer.

In order to identify the best fertilizer for use, we need to understand what effect each micronutrient has on plants.

Nitrogen.

Nitrogen helps plant foliage to grow strongly.

Nitrogen is a component of chlorophyll. Chlorophyll not only gives plants it’s green colour, but is also a very important biomolecule. It is the site for carbohydrate formation or photosynthesis. Photosynthesis is the function that enables a plant to absorb energy from the suns light.

A plant with sufficient nitrogen will show vigorous foliage growth.

Blood meal fertilizer is an excellent source of nitrogen.  However, as it’s an animal derivative, ensure the fertilizer is sterilised to prevent any potential contamination.

Blood meal fertiliser is a fast release fertilizer. Blood meal is highly soluble and therefore fast acting.


Blood meal fertilizer is typically labeled

N 13.25% : P 1% : K 0.6%.

Planting legumes is another method for increasing nitrogen levels in soil. Legumes have the ability to fix atmospheric nitrogen in their root system, and, in a form that is accessible to plants. The roots develop nodules where the nitrogen is stored. To maximise nitrogen levels in the soil, allow legumes root system to break down in the soil once their productive life is over.

Chicken pellets are also a good source of nitrogen. It can be slightly alkaline, it has a pH range of 6.5 to 8.0.


Chicken pellet fertilizer is typically labeled

N 4% : P 2% : K 1%


Phosphorous.

Phosphorous encourages root and shoot growth, and aids the overall development of the plant. It also plays a key part in photosynthesis, the development of flower, fruit and seed production as well as the plants ability to use water efficiently.

Phosphorous is a component of the complex nucleic acid structure of plants (DNA), which regulates protein synthesis. Phosphorous is important for cell division and the development of new tissue.

Although there may be phosphorous present in the soil, a large proportion of it may not be in a form that is accessible to plants, this is known as fixed phosphorous. This may remain in the soil for years. Any phosphorous in the soil or applied to the soil must be converted to the orthophosphate (soluble reactive phosphate) form before plants can utilise it.

A deficiency of phosphorous results in stunted growth.

Bone meal fertilizer is a good source of phosphorous and calcium, it also has a small amount of nitrogen, and this is of little use to plants. Again it’s an animal derivative so ensure the fertilizer is sterilised to prevent any potential contamination. Use bone meal sparingly. There is risk of burning, so apply directly to the soil and avoid contact with the plants foliage.

Bone meal fertiliser is a slow release fertilizer. The nutrients from bone meal are insoluble in water and therefore must convert in the soil in to a form that can be utilised by plants. This takes time so the results won’t be immediate. It takes between two to three months to activate.

Plants can only get phosphorous from bone meal fertilizer if the soil pH is below 7, according to a recent Colorado study.

Bone meal fertilizer is alkaline but it’s use will have a negligible impact on the soils pH level. Literally tonnes would have to be used.


Bone meal fertilizer is typically labeled

N 1% : P 13% : K 0%


Potassium

Potassium encourages flower and fruit production. It also improves the plants resistance to disease by helping thicken cell walls in stalks and stems. It is also vital for longevity and aids the plants hardiness against harsh winters. It can also help increase crop yield and improve crop quality.

Potassium does not form part of the chemical structure of a plant but it is key to many important regulatory roles in the plants development. Potassium activates around 60 enzymes involved in plant growth. For example, plants require potassium to regulate the opening and closing of stomates/stomata. Stomates are pores through which the plants leaves exchange carbon dioxide, water vapour and oxygen. Proper functioning of stomates is vital for photosynthesis. Potassium is also responsible for activating enzymes that regulate water and nutrient transportation, protein synthesis, starch synthesis, and transportation and storage of energy.

Potassium is plentiful in soil, especially clay soil, but very little of it is readily available to plants in a form they can utilise. Approximately 90% to 98% of potassium found in soil is ‘unavailable’ potassium. Typically only potassium that has been dissolved in water can be used by plants.

Potash or wood ash can be a good source of potassium. Wood ash contains approximately 3% potassium. However, the levels of potassium depend on the age of the wood and the combustion temperatures. Young wood from pruning has a higher level of potassium than older thicker branches.

Wood ash has a liming effect, it can be used to make soil less acidic.

Vegetables grow best in soil with a pH value of 6.5. Wood ash/potash can raise the soils pH level. It is therefore important to check the soils pH level before applying potash. However, where club root is present, wood ash can be used to raise the soils pH level to 7.5 or above. The disease isn’t able to survive

Fruit trees perform best in slightly acidic soil. As potash reduces the soils acidity, it may not always be suitable for the fruit garden.

Seaweed fertilizer

Most commercial seaweed fertilizers are low in nitrogen, phosphorous and potassium.

Seaweed fertilizer is typically labeled

N 0% : P 0% : K 1%

Whilst low in micronutrients, seaweed fertilizers contains approximately 60 trace elements, growth hormones and disease control properties. Seaweed is also an excellent food source for beneficial fungi in the soil. It is a gentle fertilizer that has many benefits and is ideal for organic gardening.

Soaking seeds in a weak solution of seaweed can aid germination, root development and give the seedling extra vigor!

Liquid seaweed is an excellent way to give seedlings a healthy start. Diluted in water and sprayed on to foliage. It promotes strong root growth and helps protect young plants from disease. This is also true of mature plants. Spraying a weak solution on the plants foliage during the growing season will help give the vegetable plants a boost

It can also be used as a foliar spray on flowers. If sprayed a couple of days before cutting, it will give the cut flowers

Posted in Fertilisers

Hello world!

Welcome to WordPress.com! This is your very first post. Click the Edit link to modify or delete it, or start a new post. If you like, use this post to tell readers why you started this blog and what you plan to do with it.

Happy blogging!

Posted in Uncategorized
Calendar
February 2026
M T W T F S S
 1
2345678
9101112131415
16171819202122
232425262728